How to Add Ads.txt File in Blogger (2026 Guide): Fix "Earnings at Risk"
How to Add Ads.txt File in Blogger: A Simple, Human-Friendly Guide
If you’ve recently checked your Google AdSense dashboard and saw a scary red warning saying "Earnings at risk: You need to fix some ads.txt file issues," don't panic. You aren't alone.
As someone who has spent years tweaking Blogger (Blogspot) sites, I know how frustrating these technical hurdles can be. Today, I’m going to show you exactly how to fix this in less than 5 minutes—without needing any coding skills.
What Exactly is an Ads.txt File?

Before we jump into the "how," let’s understand the "why." Ads.txt stands for Authorized Digital Sellers. It’s a simple text file that tells advertisers which companies (like Google AdSense) are authorized to sell ads on your website.
Think of it as a digital ID card for your blog. It prevents "domain spoofing," where hackers pretend to be your site to steal your ad revenue.
Step-by-Step: Adding Ads.txt to Blogger
Blogger makes this process quite straightforward compared to other platforms. Follow these steps carefully:
1. Get Your AdSense Publisher ID
First, you need your unique ID.
Log in to your Google AdSense account.
Go to Account > Settings > Account Information.
Look for your Publisher ID (It looks like this:
pub-0000000000000000). Copy it.
2. Prepare the Code
Your ads.txt file needs a specific line of code. Copy the text below and replace the zeros with your actual Publisher ID:
google.com, pub-0000000000000000, DIRECT, f08c47fec0942fa0
Pro Tip: Make sure there are no extra spaces or missing commas. The last code (
f08c47fec0942fa0) is Google’s global tag and is the same for everyone.
3. Enable it in Blogger
Open your Blogger Dashboard.
Go to Settings from the left-hand menu.
Scroll down until you find the Settings > Monetization section.
Turn on the toggle for Enable custom ads.txt.
Click on Custom ads.txt, paste your code there, and click Save.
Refer Google Adsense ads.txt guide for more information.
How to Verify if it's Working?
Google doesn't update its dashboard instantly. It might take 24 hours to 7 days for that red warning to disappear. But you can check if the file is live right now!
Open a new browser tab and type: https://yourblogname.blogspot.com/ads.txt (Replace yourblogname with your actual URL).
If you see your google.com, pub-xxx... line on a white screen, congratulations! You’ve done it correctly.
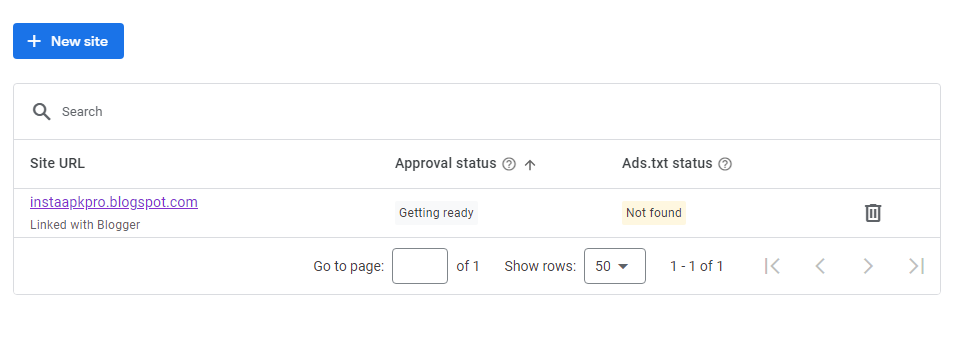
If you don't add ads.txt file to your site when you are using adsense for blogger then you will see error in your dashboard. Earnings at risk - You need to fix some ads.txt file issues to avoid severe impact to your revenue. This is how it looks in Google Adsense dashboard. It is basically the same error like ads.txt status not found.

Common Mistakes to Avoid
In my experience, many bloggers fail to rank or lose revenue because of these tiny errors:
Typing 'PUB' instead of 'pub': It must be lowercase.
Missing Commas: The structure must be exactly as shown above.
Hidden Spaces: Sometimes copying from a PDF adds invisible characters. Always paste into a plain Notepad first if you are unsure.
Recommended: Alternate Page with Proper Canonical Tag error
Frequently Asked Questions (FAQ)
1. How long does it take for AdSense to find the ads.txt file?
Usually, it takes between 24 and 48 hours, but in some cases, it can take up to a week for the "Earnings at Risk" message to disappear from your dashboard.
2. Do I need an ads.txt file if I'm not using AdSense?
If you are using other ad networks like Ezoic or Media.net, they will provide their own lines of code to add. It is always best practice to have one for security.
3. Can I have multiple lines in my ads.txt?
Yes! If you use AdSense and another ad network, simply put them on separate lines within the same "Custom ads.txt" box in Blogger.
Final Thoughts
Setting up your ads.txt file is like locking the front door of your business. It’s a small step, but it protects everything you’ve built. Now that you’ve fixed it, you can get back to what you do best: creating great content for your readers!